
Description
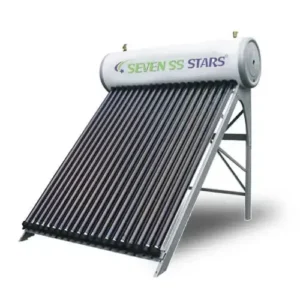
300L Low Pressure Solar Water Heater Key Features
-
High Capacity: Designed to provide ample hot water for large families (approximately 8-10 members) or small businesses, ideal for daily bathing, kitchen use, and light commercial cleaning .
-
Durable Construction: Features a high-grade inner tank with anti-corrosion protection, ensuring superior hygiene, durability, and longevity .
-
Low Pressure System: Specifically designed for non-pressurized (gravity-fed) applications. The maximum working pressure is typically around 0.05Mpa (approx. 7.25 PSI) , making it compatible with header tanks and areas with unstable water pressure .
-
High-Efficiency Technology: Utilizes advanced evacuated glass tubes with three-target coating for maximum solar absorption (up to 96%) and minimal heat loss, ensuring hot water even on cloudy days .
-
Excellent Insulation: The tank is insulated with high-density polyurethane foam (50-65mm thickness) to keep water hot overnight, minimizing temperature drop .
-
Durable Outer Frame: The frame is made from powder-coated or galvanized steel, providing robust support and resistance to rust and weather elements .
-
Reliable Performance: Built to withstand diverse weather conditions while providing consistent hot water output .
300L Low Pressure Solar Water Heater Complete Technical Specifications
To ensure you have all the details for installation and product listings, here are the in-depth technical specifications for this 300L model.
Tank Specifications
-
Inner Tank Material: High-grade anti-corrosion coated steel / Enamel-lined steel
-
Inner Tank Thickness: 0.5mm – 0.6mm
-
Outer Tank Material: Corrosion-resistant colored steel or pre-coated zinc wrap
-
Insulation Layer: 50-65mm high-density polyurethane foam
-
Tank Capacity: 300 Liters (Total storage)
-
Inlet/Outlet Hole Size: Male G 1/2″ or 3/4″ (Standard plumbing connections)
Collector Tube Specifications
-
Tube Type: Three-target evacuated glass vacuum tubes
-
Tube Dimensions: Standard 58mm (diameter) x 1800mm (length)
-
Number of Tubes: Typically 24 to 30 tubes (depending on the specific model configuration) .
-
Glass Material: High borosilicate glass (3.3)
-
Absorption Rate: 93% – 96% (AM1.5)
-
Emission Ratio: 4% – 6% (at 80°C)
System Specifications
-
System Type: Direct (open circuit) / Non-Pressurized (Low Pressure)
-
Maximum Pressure: 0.05 Mpa
-
Connections: 5 ports typically located on the tank (Air Vent, Inlet, Outlet, Electric Heater Backup, and Temperature Sensor/Solar Loop) .
-
Installation Type: Suitable for pitched or flat roofs with a sturdy powder-coated frame .
-
Full System Weight (approx.): 350 kg – 400 kg (when filled with water) .
Installation Guide & Best Practices
Proper installation is key to the performance and longevity of your solar water heater. Follow these step-by-step instructions or ensure your installer adheres to these standards.
Step 1: Site Selection & Mounting
-
Orientation: In the Northern Hemisphere, the collector should face South. In the Southern Hemisphere, face North. The ideal orientation is typically within 10°-15° of true North/South to maximize sun exposure .
-
Shading: Ensure the location is free from shading by trees, buildings, or other obstructions throughout the day.
-
Roof Structure: The mounting surface must be capable of supporting the heavy weight of a full system (approx. 400kg). Use concrete bricks or reinforced stands if necessary .
-
Fixing the Frame: Securely fix the frame feet to the roof or foundation using expansion bolts. In windy areas, use steel wires to firmly fasten the tank and frame to prevent movement .
Step 2: Tank and Tube Assembly
-
Position Tank: Carefully place the tank onto the frame cradle. Ensure the tank is perfectly level by using waterproof cushions to adjust the frame height. All feet must contact the surface evenly to avoid frame deformation .
-
Prepare Tubes: Clean the glass end of the vacuum tubes with water or detergent to lubricate the seal.
-
Insert Tubes: Gently insert the tubes into the tank’s rubber seals (silicon rings) using a firm, twisting motion. The force must be directed along the axis of the tube to prevent breakage .
-
Secure Tubes: Place the bottom of the tubes into the tail support holder on the frame and push the insulation ring up to the tank for a tight seal.
Step 3: Plumbing Connections
-
Piping: Use standard galvanized or copper pipes for connection. For unvented or specific safety requirements, copper pipe is highly recommended .
-
Safety Valves (Crucial for Low Pressure): Because this is a low-pressure system, it must never be connected directly to high-pressure mains water without a control valve.
-
Install a Pressure Control Valve (set to 400kPa or as per local codes) on the inlet .
-
Install Vacuum Breakers on the inlet and outlet to prevent tank collapse or siphonage .
-
An Assistant Tank (small header tank) is often required to regulate the water supply and maintain consistent pressure.
-
-
Sealing: Use Teflon tape or suitable thread sealer on all threaded connections to prevent leaks. Use compression fittings on cylinder connections where specified .
Step 4: Final Checks
-
Fill the System: Ensure the system is filled with water before exposing the tubes to the sun. Filling an empty tank on a sunny day can damage the tubes due to thermal shock.
-
Check for Leaks: Inspect all seals, pipe joints, and tank connections.
-
Electrical Backup (Optional): If the model includes an electric backup element, ensure the tank is full of water before switching on the power to prevent burning out the element .
-
Temperature & Pressure Relief: Ensure the T&P relief valve discharge pipe is routed to a safe, visible drain location and is not blocked .
Maintenance Tips
-
Tube Cleaning: Clean the glass tubes periodically (every 6-12 months) to remove dust and dirt that can block solar radiation.
-
Valve Check: Manually operate the pressure relief valve at least once a year to ensure it is not stuck. Caution: The water discharged may be very hot. .
-
Visual Inspection: Regularly check for any condensation inside tubes (a sign of a broken vacuum) or leaks from the tank connections.
Get Your 300L Solar Water Heater Today
Upgrade to a cost-effective, “fit-and-forget” solution for your hot water needs. Contact us for more information or to schedule your installation.
📞 Call or WhatsApp: 0794485343
📧 Email: info@globussolar.com
🌐 Website: www.globussolar.com


Reviews
There are no reviews yet.